Participants link in Navigation menuOn the Participants page you can access information about enrolled staff and students in your unit, such as:

  • Personal information such as their name, student/staff ID, and email address.
  • Unit information such as their roles and group enrolments.
  • The last time they accessed the unit.

To access the Participants page:

  1. Navigate to your LEO unit.
  2. Click the Participants link in the unit navigation menu on the left (see image right).

User management functions

The functions available on the Participants page include:

  • The Enrol users button allows editing lecturers to enrol other teaching staff into a unit.
  • The cog icon in the top right provides access to groups and user enrolment functions, such as Groups.
  • You can filter the list of participants by adding conditions.

See the sections below for more information on the functions available on the Participants page.

Students in LEO units are automatically enrolled through the link to Banner, the student management system at ACU. Lecturers are unable to add or remove students from their units, as LEO will automatically do this itself.

Lecturers in charge (editing lecturers) will need to manually add other lecturers and tutors to their unit.

Video: How to enrol other staff in your LEO unit

View the above video How to enrol other staff in your LEO unit on Echo360.

About the Lecturer and Editing Lecturer roles

The two roles that may need to be added are Editing Lecturer or Lecturer.

An Editing Lecturer has access to features and functions in a LEO unit to perform the design, development, teaching and management tasks including:

  • creating or copying a new unit
  • creating or editing learning materials and activities
  • creating or editing assessment tasks (e.g. quizzes, assignments)
  • enrolling other teaching staff.

A Lecturer role is often more like a tutor in a unit. Lecturers have access to limited features and functions in a LEO unit including:

  • accessing units in which they are involved for the purposes of teaching and assessing students.
  • access and use content and tools in units (e.g. post to forums) but not add activities or alter settings.
  • access to mark student work.

If groups are set up in the unit, the Lecturer will only be able to see and assess student work where the lecturer is in the same group(s) as the student.

For more information about LEO roles and responsibilities, refer to Getting started: responsibilities

How to enrol other staff in a unit

Important note: be sure to enrol staff in your unit using their staff account, which uses the @acu.edu.au email address, NOT their student account (if they have one), which uses the @myacu.edu.au email address.

  1. Navigate to your unit in LEO.
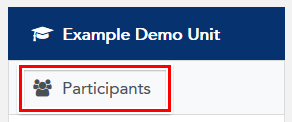
  2. In the unit navigation menu, click the Participants link:
    Participants link in Navigation menu
  3. Click the Enrol users button.
  4. From the popup window:
    1. Select the preferred role from Assign role drop down menu.
    2. Type the user's name in the Search users text box.
    3. Scroll the list of users matches to find the user in the list, then select their name from the list.
    4. When clicked, the user's name will appear above the search box as a tag block. If you wish, you can search for and add more users to enrol several staff members at a single time, giving them all the same role. To remove a user you've selected, click their tag to remove them.
    5. Click the Enrol users button to complete the enrolment process.

    The enrol users interface 

The new user will appear in the list of participants, along with their role(s) in the unit.

For more information about self-enrolment options or adding non-participating students, please contact LEO support.

The Users and Groups menu, accessible via the cog icon on the Participants page, includes access to the Groups page. To access the Groups page:

  1. Navigate to your unit in LEO.
  2. Click the Participants link in the navigation menu.
  3. Click the cog icon in the top right and select Groups from the drop-down menu:
    Users and groups menu

Groups are a collection of users enrolled in the unit.

The Groups page in your unit allows you to create groups and groupings, as well as view Banner groups and imported Tutorial Direct groups:

Participants-groups

When a Banner student cohort is selected during the create unit process, the students are automatically enrolled in your unit. For more information about creating and rolling over units, refer to LEO Guides: Creating a new unit.

You can integrate your unit with Tutorial direct by selecting this option in the unit settings under Groups. For more information Tutorial direct refer to LEO Guides: Unit settings and integrate Tutorial Direct.

To learn more about Groups and Groupings including how to create groups and groupings and signup groups, refer to LEO Guides: Groups and Groupings.

The Participants list displays all users in your unit by default, including students and staff:

A list of participants  

How to filter the participants list

You can filter the participants list by adding conditions:

An example of a filter
  1. Click the Add condition button.
  2. Click the Select drop down menu to choose a filter (ie "inactive for more than"). Other filter selection options include roles and groups.
  3. Click the Type or select drop down menu to choose a filter condition (ie "2 weeks") or type in your own.
  4. Click the Apply filters button.

You can add additional conditions to further refine the list if you require by repeating the steps above.

To clear filter conditions from the participants list, click the Clear filters button.

You can choose all participants or a selection of users and perform bulk actions:

  1. Select the users you wish to message or download:
    1. To select all participants, check the first box directly under the First name column to select all participants (note: to display the complete list of all participants enrolled in your unit, ensure you click the Show all link at the bottom of the page)
    2. To select specific participants, firstly filter the list, then check the box next to just the users you wish to message or download.
  2. At the bottom of the page, click the with selected users drop down menu to:
    • Send a message to these users (note: how the student receives this will depend on their notifications settings).
    • Download the participants list as an Excel, CSV or PDF document.
Page last updated on 22/06/2021

Service Central

Visit Service Central to access Corporate Services.


Other service contacts


Learning and Teaching
Library
Request Something

Make a request for services provided by Corporate Services.


Request something
Knowledge base

Find answers to frequently asked questions 24/7.


See Knowledge Base