Some important questions to help you get started:

The unit title (full name and short name) is based on the unit code and location on the first Banner cohort you selected during the unit creation process:

Full name and short name

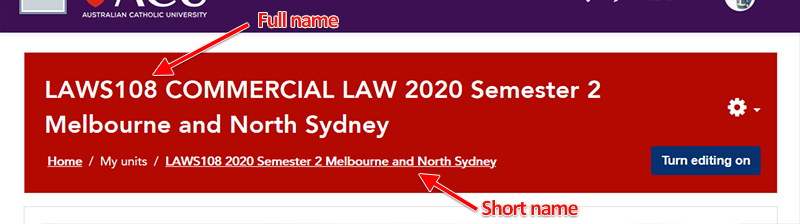
By default the unit short name will appear as a breadcrumb, e.g. LAWS108 2020 Semester 2 Melbourne and Sydney. The short name is also added as a prefix in the subject line of any emails that students receive from the unit (such as announcements or forum posts).

In the top section of your unit the full name will appear e.g. LAWS108 COMMERCIAL LAW 2020 Semester 2 Melbourne and North Sydney.

If you have created a unit that includes more than one Banner cohort, and you want to change the title after the unit is created to include the other cohort's location, you can edit the full name and short name in your unit settings.

You can also edit the titles of your unit sections by turning the editing on and selecting the Edit option for individual sections.

By default, units go live to students two weeks before classes start, and are archived in the weeks after exam period ends.

When creating a new unit and selecting a study mode, campus and Banner cohort (which adds students via the ACU student administration system), the release date will automatically be added to your unit settings.

  • In the Unit Settings > General the "Unit Start Date" setting determines when a unit will be visible to students.
  • In the Unit Settings > General the "Unit Archive Date" setting determines when a unit will move into an Archive state (see more about Archiving units).

What is the difference between End Date and Archive Date?

The Unit End Date is usually automatically set to be the same as the archive date. A unit that has "ended" no longer appears in the navigation menu, however students may still interact with the content and activities of the unit, unlike an archived unit that are "read only" and prevent students from participating in activities.

Units that have reached their end date can be found in the Dashboard when filtering for "past" units.

Where can I find my Archived Units?

Archived units appear on your Dashboard, in the Archived Units block on the right.

Where can I find my Hidden Units?

Hidden units appear in your Dashboard for staff when filtering for "all".

Some important unit settings include:

  • The unit name
  • Whether the unit is visible to students or not
  • When the unit automatically becomes visible (before semester)
  • When it archives (after semester)
  • What format the unit takes
  • How many sections are in the unit
  • Whether the students can automatically track their progress in a unit
  • Whether group modes are enabled (particularly important if you have a large unit where different tutors will be marking their group's work, but you don't want them to have access to other students).

To access the unit settings:

  1. Navigate to your unit in LEO.
  2. Click the Cog icon in the red Title section, then choose Edit settings from the dropdown list:
    Edit settings under unit administration

Expanding settings sections

There are a lot of settings for the unit overall, and they are displayed in different sections. Click on a section heading to expand that section and view its settings.

Alternatively, you can click on Expand all to expand all sections.

Expand all link
After making any changes, ensure you click the Save and display button at the bottom of the screen to save any changes.

The following lists describe some of the main unit settings. It does not include some settings that are less relevant.

Throughout LEO you will see a question mark icon next to many settings and functions.

You can click the icon to show a description of the setting:

Setting hint

Some hints will include links to online Moodle documentation that includes further information about how to use this setting.

Unit full name: The unit full name of the unit based on the Banner cohort chosen during the unit creation process. This name generally should not be changed. It will usually include the unit ID, name, year, semester and campus of the unit.

Unit short name: A shorter version of the full name, which includes the unit ID, year, semester and campus. It is displayed in the navigation menu, in the breadcrumb links in the unit title bar, and is used in the subject line of unit email messages. The unit short name must be unique in LEO.

Visible: This setting determines whether students can see the unit in LEO. "Show" means the students can see and access the unit. "Hide" means they cannot. Before semester starts, units are usually hidden from students so that lecturers can prepare them without students coming in before they are ready.

Unit start date: The date at which the unit becomes accessible to students and the Visible setting is automatically changed to "Show". By default, this date will be two weeks before the teaching period starts.

Unit end date: The date at which the unit is no longer generally accessible through the navigation menu. This is usually the same as the Archive date.

Unit ID number: The unit ID number is a unique number that ties the unit to Banner and student enrolment. You should not change this setting unless specifically instructed to. This ID allows LEO to enrol the correct student cohort(s) into the unit.

In the unit settings there are two settings that determine the Archived state of a unit:

  • Archived: This setting determines whether a unit is in an archive state or not.
  • Unit archive date: The date at which the unit will automatically archive. By default, this is usually three to four weeks after the after the exam period for Banner units.

Manually archiving and un-archiving a unit

Banner units and non-Banner units can be manually changed to an Archive state:

  1. Navigate to your unit in LEO.
  2. Click the Cog icon to access the Unit Administration menu, then choose Edit Settings.
  3. Under the General section, change the Archived setting to "Yes".
  4. Click Save and display to save this setting.

An Editing Lecturer may choose to un-archive a unit by changing this setting to "No" to allow access to assignments and activities. This is strongly discouraged in the case of Banner units, as it will cause old units to appear in the students' list of current units, which may be confusing for them. If un-archiving a unit for any purpose, remember to immediately archive it again once you have retrieved any information you require.

Unit Summary

Information about your unit can be displayed to your students in their Dashboard if they are viewing units with the Summary display type. Many LEO users access Dashboard to locate units they are currently enrolled in. Adding a description can create a more dynamic and engaging visual display that students can see at a glance.

Edit the settings of your unit, then add a short description in the Unit summary text box:

Unit summary setting

Unit Image

You can add an image to use as the background of your unit when viewed in the Card display type on the Dashboard. To add an image and display it in the dashboard, upload an image to the Unit image:

Upload a unit image setting
  1. Click the File button in the top-left corner of the upload box and select an image from your computer. Or,
  2. Drag and drop and image from the Explorer or Finder window into the upload box.

Note: If you wish to use images, it is recommended to ensure you have the rights to do so. For more information about creative common sources for images, refer to How to source creative commons content.

Unit Format

The usual and preferred format for units in most faculties is the Tile format. This is where the unit home page displays tiles, including images for each section of a unit. Tabs (at the top and bottom of the page) are also available for each section in the tile format. Some units may be of a different format, such as Modules or Topics.

Number of sections

Units are displayed in sections which are often topic or week-based. This setting allows you to increase or decrease the number of sections used in your unit.

Hidden sections

You are able to hide individual sections from students. This setting tells LEO whether to hide the hidden sections completely, or keep the tile for the section visible but don't allow students access to that hidden section.

Note: changing the format of a unit will refresh the page and present more or less options for customising the chosen format.

In your unit settings, under Appearance section, set the Show gradebook to students setting to "Yes".

Gradebook keeps track of all student assessments and activities (formative and summative). However, as many academics use spreadsheets to keep track of marks, you can hide the Gradebook if it is not relevant to students.

If the Gradebook is hidden, students can still access the marks they received by going into the individual assessments in the LEO unit.

For more information, please see LEO Guides: Gradebook.

By default this setting is turned off, however it may be already active in units you roll over.

Enabling completion tracking means that a check box appears next to the name of each activity and resource listed in the unit. These check boxes can be configured to automatically "tick" (be marked complete), when a student has completed the activity (for example, by opening a reading, or posting in a forum, or achieving a certain mark in a quiz).

Completion tracking can be used to restrict access to certain parts of the unit until previous parts are complete.

For more information, please see LEO Guides: Activity and unit completion tracking.

Group mode

Changing this setting changes the default setting when new activities are created in the unit. This setting can still be overridden in the individual activities.

  • Separate groups is important if you have separate markers (perhaps tutors) and do not want these tutors to be able to see or change the marks of a student who is not in their tutorial group.
  • Separate groups also means that multiple groups of students can access the same activity but only see content by those in the same group.
  • No groups is worth setting here if you will not be using any groups in your unit. This means any new activities you create will be set to No groups also.
  • Visible groups is a less popular option that allows students to work only in their own group, but still see the other groups in the unit.

Force group mode

If group mode is forced, then the unit group mode is applied to every activity in the unit. Group mode settings in each activity are then ignored.

Default Grouping

If you choose a grouping from this setting, activities will by default be only available to groups in that grouping.

Integrate with Tutorial direct

Tutorial direct is a separate system at ACU that allocates students to tutorial groups. If Tutorial direct is used for this unit, enable this setting to allow LEO to automatically create and update student groups based on their tutor groups in Tutorial direct.

Page last updated on 24/06/2021

Service Central

Visit Service Central to access Corporate Services.


Other service contacts


Learning and Teaching
Library
Request Something

Make a request for services provided by Corporate Services.


Request something
Knowledge base

Find answers to frequently asked questions 24/7.


See Knowledge Base