To add a Block to your LEO unit:

  1. Navigate to your unit and click on Turn editing on.
  2. In the left Navigation menu, click the Add a block link (this is usually located at the bottom).
  3. From the popup window, click the type of Block you wish to add.
  4. You will be returned to your unit, and your new Block will be added to the bottom of the right-hand side of the page, under any existing blocks.
  5. Click the Cog icon for your new Block and choose the Configure option:
    New block with configure option
  6. Edit the settings for this block. The type of Block you have selected will dictate which settings are available for you to edit (for example, if you add a HTML Block you will also be able to add dynamic content at the next step). Some block settings cannot be modified. For most blocks you may set the following settings:
    • Display on page types: select which type of page your Block will display on.
    • Default region: select the column in which your Block will display (middle or right).
    • Default weight: select the default weight of the Block. The weighting of your block will dictate where it will sit on each of the pages within your LEO unit. The location is calculated based on the weighting you have given this block, plus the weighting given to all of the other Blocks which are displayed on that page, meaning the location of your Block could change depending on the other Blocks you have added, and the weighting you have given them.
  7. Click Save changes when you are done to save your Block settings.

You can reposition the Blocks within your LEO unit by use the handle to drag and drop them to a new location. NOTE: This will only relocate the Block within the page of the LEO unit you are on and not across all pages.

To drag and drop a Block to a different location within your LEO unit you need to:

  1. Click the Turn editing on button.
  2. Locate the Block you want to relocate, then click and hold on the Handle icon to the right of the Block's name:
    Handle used to move blocks
  3. While still holding onto this icon, you can now drag your Block into position. Once you let go of the mouse button, your Block will lock into place in its new position.
Note that some faculties and schools will require you to have certain Blocks in your units available to students, and often in a particular order. If you are unsure of what should be in your unit, please talk to your school or supervisor.

There are many different kinds of Blocks you can add to your LEO unit, which serve a variety of purposes. Some of the more commonly used Block types are outines below:

ePortfolio

The 'ePortfolio' Block is a way of drawing your student's attention to ACU's ePortfolio tool. This Block contains a direct link to the ePortfolio environment. This block is particularly useful if you are asking your students to publish content to their ePortfolio for the purposes of assessment.

Latest badges

The 'Latest badges' Block displays the latest badge a student has earned from within the LEO unit. Badges can be used to encourage your students to interact with the activities and resources within your LEU unit. Adding badges to your LEO unit, and displaying them in this way, is a form of 'gamification'.

Remote RSS feed

RSS stands for 'Rich Site Summary'. RSS is a format useful for delivering regularly changing online content. Many news sites, blogs, and online publishers make their content available as an RSS feed. If you add an RSS feed to your LEO unit, your students will have access to a constantly changing stream of dynamic content, curated by you.
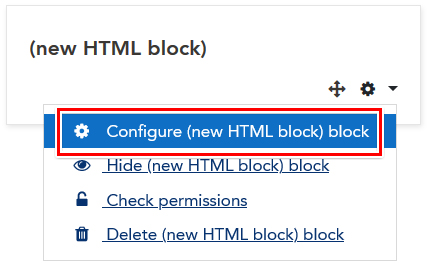
HTML

One of the most versatile blocks is the HTML block.  This block can be used to display text, images, YouTube videos, social media Feeds, and other content you can 'draw in' or embed from the web.

Page last updated on 06/01/2021

Service Central

Visit Service Central to access Corporate Services.


Other service contacts


Learning and Teaching
Library
Request Something

Make a request for services provided by Corporate Services.


Request something
Knowledge base

Find answers to frequently asked questions 24/7.


See Knowledge Base