Using the Active Learning Platform (ALP) you can create presentations comprising of content and activity slides to use in-class, and use the features of ALP to encourage participation and gather feedback from students while presenting.
Adding a new presentation to a class
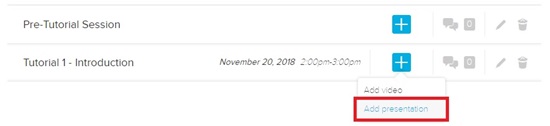
- In ALP, on your list of classes, click the 'Plus' icon for the class you wish to add a presentation to, then choose the 'Add presentation' option:
- On the Add a presentation popup window, click the 'Create a new presentation' option.
Adding your content slides from PowerPoint
ALP enables you to upload a PowerPoint file and use these slides within your ALP presentation.
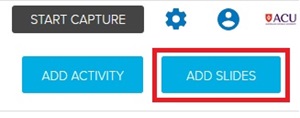
- Click the 'Add slides' button in the top right corner of the screen:
- Click the 'Upload slides' button and use the popup window to choose a PowerPoint file to upload (see Adding slides of different types below for information on the other options).
An "Imported slides" preview panel will appear the bottom of the screen. It may take some time to process your slides. When ready, slides will be shown here for you to choose from:
- Click a slide to select it, then click 'Move selected to presentation' to add the slide to your new presentation:

With the Preview Panel you can:
- Select all slides to move by clicking the 'Select all' button.
- Select specific slides to move by clicking one slide to select it, holding down the Control (Command) key, then clicking additional slides to select them as well.
- Delete slides using the 'Delete' button, which removes them from the Preview panel (it does not delete the slide from your Library, just the preview).
You may also import more slides from another source into the preview panel using the 'Add slides' button again.
Editing your presentation slides
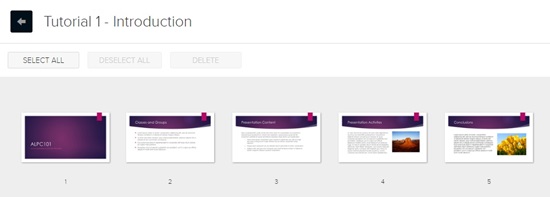
After choosing your slides from the preview panel and moving them to your presentation, your presentation should appear in the main part of the page with each slide you've added:
- Rearrange the order of slides by clicking and dragging a slide to a new position in the slide order.
- Delete slides by clicking them to select them, then clicking the 'Delete' button.
- The Presentation will automatically save as you add and delete slides, or after rearranging them.
Adding an activity slide
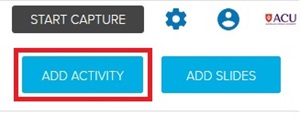
- Click the 'Add activity' button at the top right of the screen:
- Choose an activity type from the list of available types:
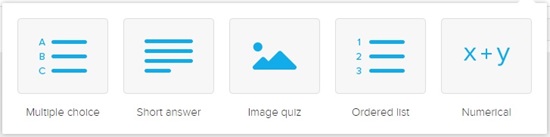
Each activity allows you to ask a question, and:
- Multiple choice: create a list of optional answers with a single correct response.
- Short answer: allow students to answer using a short written response.
- Image quiz: allow students to answer by selecting a part of the image as an answer.
- Ordered list: ask students to put items in the correct order.
- Numerical: answer with a number that is exact or within a certain range.
- When the popup box appears, complete the settings for the activity and click the 'Done' button when finished.
- Move the activity slide to the point in the Presentation where you wish it to appear. Activity slides may be moved around just like content slides (see Editing your Presentation slides above).
Previewing, editing, and removing presentation slides
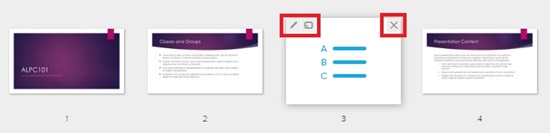
In the presentation preview, you can hover over a single slide and access three options for that slide, using the icons that appear over the slide thumbnail preview:
- Edit details: click the 'Pencil' icon to open the settings for that specific slide (Activity slides only).
- Full screen preview: click the 'Box' icon to show the slide in full screen as it will appear to students.
- Delete: click the 'Cross' icon and confirm to remove this slide from the Presentation.
When your presentation is complete
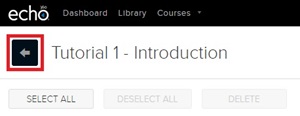
When you have added all the slides for your Presentation, you can return to the list of Classes by clicking the 'Back' arrow next to the title of your Class, at the top left of the screen:
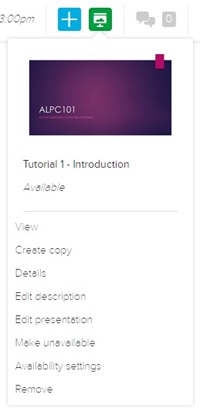
You should now see the class listed with a green 'Presentation' icon:

You can click this icon to bring up a menu with presentation settings and options (see Changing class presentation settings below).
Note: previously created presentations are saved in your personal library, so you can reuse them if you wish.
 When view the list of Classes in ALP, you can view and modify the Presentation attached to a Class by clicking the green 'Presentation' icon associated with that Class.