Gradebook setup link in unit admin menuStaff with the Editing Lecturer role in the unit can modify the gradebook setup.

If there are multiple teaching staff in a unit, this is usually the responsibility of the LIC.

To access gradebook setup:

  1. Navigate to your unit in LEO.
  2. Click the Cog icon to open the Unit Administration menu, then choose Gradebook setup (see image right).

As the setup of gradebook is replicated when a unit is rolled over, you may see gradebook already set up in a specific way with categories, activities, and other grade items already in place. However, some activities may not have been copied over, or you may wish to add new activities to your unit that will appear in gradebook, requiring you to make some changes.

How to customise your gradebook setup

There are various elements that are involved in the setup of gradebook, which are covered in the steps below. 

These topics will build upon this starting gradebook example, which we will customise step by step to achieve the example gradebook shown at the bottom of this page.

 Starting example of a unit gradebook

Categories in gradebook are useful for grouping your unit activities together.

It is often useful to create an Assessable and a Non-Assessable category to separate summative and formative activities, making it clear to students the activities that will contribute to their overall grade and those that won't.

You can create as many categories as you need to, and make them as sub-categories if you wish, however it is always advisable to keep your gradebook setup as simple as possible.

How to create a new category

  1. Navigate to the Gradebook setup page in your unit.
  2. Below the list of activities, click the Add category button:
     The add category button
  3. In the Category name field, enter a name (such as "Assessable").
  4. Choose an aggregation type from the Aggregation drop-down list (for more info, please see Moodle Docs: Grade aggregation).
  5. Modify any additional settings you require (more on these settings in topics below).
  6. Click the Save changes button.

You will then be returned to the gradebook setup page, where you should see your new category at the bottom:

 A new Assessable category in gradebook

Repeat these steps to add more categories if required (such as a "Non-Assessable" category).

How to edit the category settings

You can edit the settings for a category by clicking the Edit button for that category and selecting Edit settings:

 Editing the category settings

All gradebook items (including categories, graded and ungraded activities) can be repositioned in gradebook by using the Move functions. This enables you to define the order of your categories and the items in them.

How to move multiple items into a category

  1. Check the boxes on the right of the page for each item you wish to move:
     Multiple gradebook items selected
  2. At the bottom of the page, click the drop-down menu and select the category you wish to move the items to:
     Choosing the category to move items to

How to move a single item

  1. Click the Move button next to the item name:
     The item move button
  2. When the page has reloaded, click the Box in gradebook where you want the item to appear:
     The space to move the item to

You can then repeat this process to move items into the order you want them to appear.

Placing a single item inside a category

Using the same process as above:

  1. Click the Move button for the item you wish to put in the category:
    Click the move button for the activity
  2. Click the Box inside the category to place it there:
     Place activity in category
    Note that the boxes inside categories will be indented to make identifying them easier, as in the image above.

In the image above, the Assessable category has been placed at the top of gradebook, and the activity is being placed inside that category.

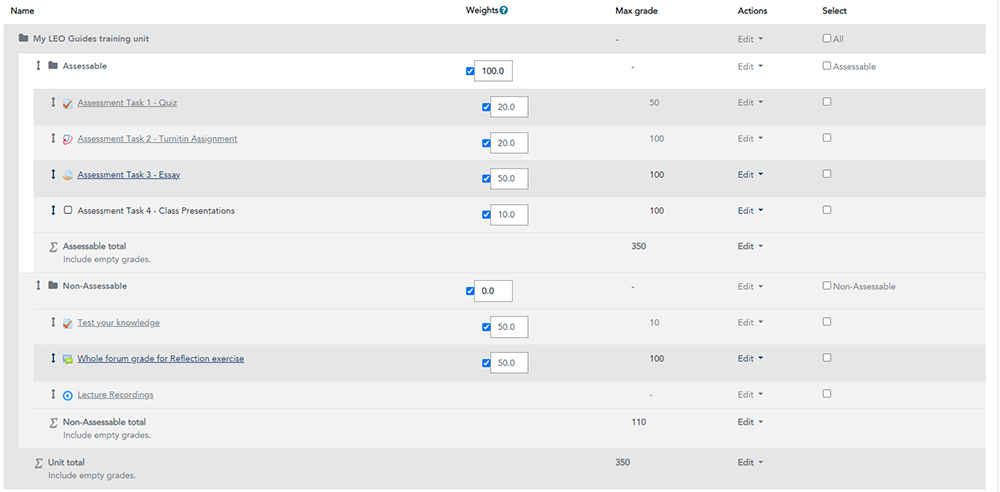
Each category in gradebook can be set up to display and weight grades as required. The items inside each category can be weighted to contribute to the total for that category.

How to weight your gradebook categories

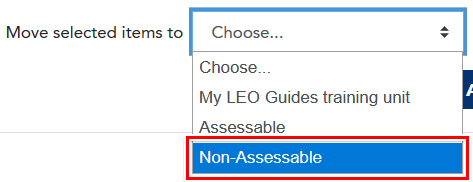
In this example, the Assessable category will account for 100% of the overall unit grade, and the Non-Assessable category will account for 0%. 

  1. Click the Edit link for the unit name at the top of the gradebook setup page, then choose Edit settings:
    The edit settings option for gradebook
  2. On the settings page, under the Grade Category heading, set the Aggregation dropdown should be set to "Natural".
  3. Under the Category Total heading, you should also hide the overall grade by checking the Hidden dropbox. It is usually best to hide the unit total from students in gradebook, as students should receive their final grades in Student Portal, not in gradebook.
  4. Click the Save Changes button to save and return to gradebook.
  5. You can now check the boxes for each category under the Weights column and enter the percentage of weighting required. In this example, the Assessable category is 100 and the Non-Assessable category is 0:
     The weighted gradebook categories
  6. Click the Save Changes button to save your weights.

Note: if the weights you enter do not add up to 100%, gradebook will automatically rebalance them to equal 100.

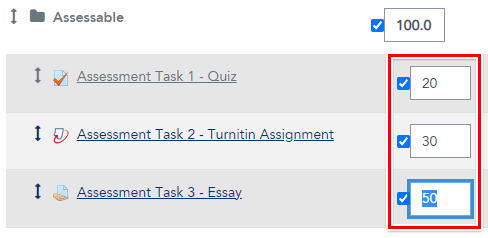
How to weight items within a category

The weights of each item in a category should reflect the contribution of each item to that category. For assessable items, this should reflect the information available in their unit outline.

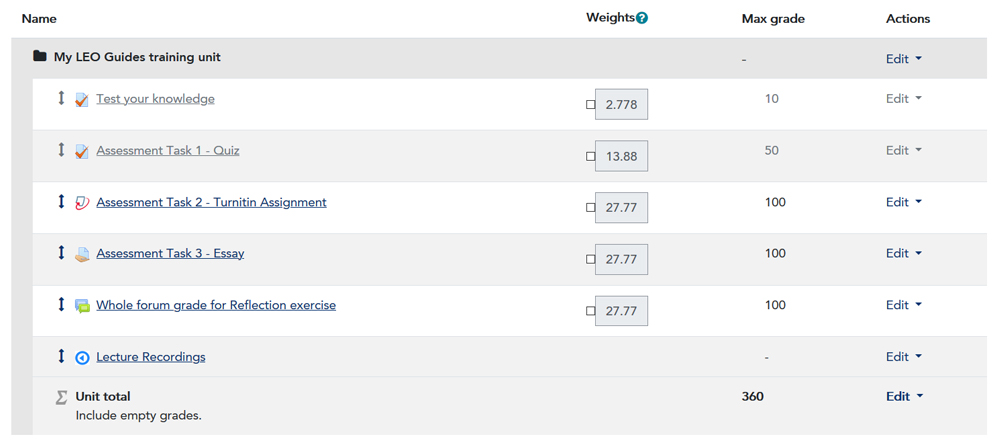
In this example, the Assessable category contains three assessments items, equaling 20%, 30% and 50%, respectively:

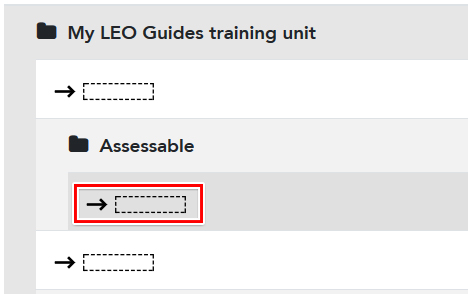
  1. Firstly, move the items required into the Assessable category and put them in the required order.
  2. For the Assessable category, click the Edit link then choose Edit settings:
     Editing the category settings
  3. On the settings page, under the Grade Category heading set the Aggregation dropdown box to "Natural".
  4. Under the Category Total heading, hide the category total by checking the Hidden dropbox.
  5. Click the Save Changes button to save and return to gradebook.
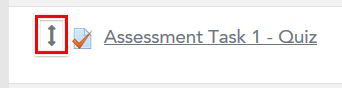
  6. For each item within the category, check the boxes in the Weights column to make them editable, then edit the weighting for each item:
     Weighting items in a category
  7. Click the Save Changes button to save your weights.

Note: if the weights you enter do not add up to 100%, gradebook will automatically rebalance them to equal 100.

How to set maximum grades

When activities such as Assignments and Quizzes are created, you can set the maximum grade for the assessment task, which will be shown in the Max Grade column in gradebook. You cannot edit the maximum grade for these activities in gradebook. It must be updated in the settings for each individual activity.

If you're using manual grade items, you can set the maximum grade when creating the item.

Aggregation methods

The "Natural" aggregation method, which is the sum of all grades, is the simplest method to use, however additional methods are available if you need a more complex setup. For more information about aggregation methods, please see Moodle Docs 3.9: Aggregation methods.
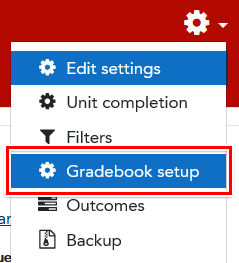
You can choose whether to show students their marks as a letter grade (on a scale from HD to NN), a percentage, a raw mark, or a combination of two. The default setting is to show a letter grade.

How to change the grade display type

You can change the grade display for the unit total, each category total and each item grade separately if you wish:

  1. For the item you wish to change, such as an assessment task, click the Edit link and choose Edit settings:
     Editing the item settings
  2. In the first section of settings, click the Show more... link to reveal additional settings for this item.
  3. Choose the desired option from the Grade display type dropdown box:
     The grade type display setting
  4. Click the Save Changes button to save and return to gradebook.

Note: changing the grade type display for a category does not change the grade type display for items in that category.

These grade types display in the following ways (for a grade of 85/100):

  • Letter: HD
  • Percentage: 85%
  • Real: 85

The additional options showing a combination of two types, such as "Letter (real)" will display the first type followed by the second in brackets, such as:

  • Letter (real): HD (85)
  • Percentage (letter): 85% (HD)

Note: Turnitin Assignments will show the numeric grade in the Turnitin Submissions Inbox and in Feedback Studio regardless of the grade type display you choose in gradebook.

Items in gradebook can be shown or hidden as required. Hiding an item will not necessarily prevent it from appearing in gradebook, but will make any grades unavailable to view until it is shown.

Hiding an activity quickly

Hidden activities will appear with a greyed-out title. Several activity types can be hidden quickly without having to edit the item's settings:

  1. Click the Edit link for the item you wish to hide.
  2. Choose the Hide option:
     Quickly hiding an item

This activity will remain hidden until you click the Edit link again and choose the Show option.

Some activities cannot be hidden quickly, as their display settings are managed in the activity settings. You can easily navigate to the activity to modify the settings by clicking the name of the activity in gradebook.

Hiding an activity until a specified date

Activities can also be hidden, then become visible at a specified date and time:

  1. Click the Edit link for the item and choose the Edit settings option:
     Editing the activity settings
  2. On the settings page, under the Grade Item heading, click the Show more... link to reveal more options.
  3. For the Hidden until setting, firstly tick the Enable checkbox, then set the date and time at which you wish the activity to become visible:
     The hidden until setting
  4. Click the Save Changes button to save and return to gradebook.

This activity will now remain hidden until the time you've specified, and will be shown as grey-out until then.

Some activities disallow the use of this function, as a similar function may exist in their activity settings already. In these cases, you will need to edit the settings for that activity.

A manual grade item is useful for recording grades for an activity that may not take place in gradebook. This may include class presentations, attendance at a tutorial or lecture, or any other graded activity that isn't automatically added to gradebook.

How to create a manual grade item

  1. At the bottom of the gradebook setup page, click the Add grade item button:
     The add grade item button
  2. Give your item a Name.
  3. Modify any of the additional settings for the grade item as required. Manual grade items may be fully configured to include:
    1. A maximum, minimum and passing grade.
    2. A customised display type (e.g. letter, number, percentage).
    3. Customised hide and show dates.
  4. Click the Save changes button to save the item and return to gradebook.

You may now move the item into the correct category and modify the weight of this activity if required.

For more information, please see LEO Guides: Adding and overwriting grades.

If you're using groups in your unit for tutorials or activities, you can choose to filter gradebook to show only users in a chosen group.

  1. Click the View tab:
     The View tab
  2. Select the Grader report view (or another view option of your choice) from the tab options.
  3. Choose the group of students you wish to view from the Separate groups or Visible groups dropdown box:

     Separate groups dropdown box
  4. The page will update, showing any students who belong to the chosen group. You can see all students by choosing the All participants option.

Setting the default Group mode for your unit

In order for the group selection dropdown box to appear above, you must have set the default Group mode setting in your unit to be either Separate groups or Visible groups. If No groups is chosen, the dropdown will not appear.

For more information on setting the Group mode, please see LEO Guides: How to set default unit group settings.

You must also have created groups in your unit for them to appear in this list. For information and instructions on creating groups, please see LEO Guides: How to create Groups.

Finished example of a gradebook setup

The following example is the completed setup after modifying the initial example shown above. In this example:

  • Activities have been grouped into Assessable and Non-Assessable categories and ordered appropriately.
  • Each assessable activity has been weighted according to its contribution to the unit total.
  • An additional assessable activity has been added to the Assessable category using a manual grade item, and the weights adjusted accordingly.
  • Category totals and the unit total have been hidden from students.
 The completed gradebook setup example
Page last updated on 20/10/2021

Service Central

Visit Service Central to access Corporate Services.


Other service contacts


Learning and Teaching
Library
Request Something

Make a request for services provided by Corporate Services.


Request something
Knowledge base

Find answers to frequently asked questions 24/7.


See Knowledge Base